SECTION 49: SEATS & SEAT BELTS
Build Instruction Updates
- N/A
Check for more recent updates here
Upgrades
Hints
Note: Vans shipped ready-to-install front seats built by a 3rd party until around 2024, then Vans designed their own seats which need assembly. Section 49 seems to exist in two versions depending on which seats you have. The newer version doesn't seem to be published on their manual update site. The hints might not apply to your version of the seats.
New Version: 49-03
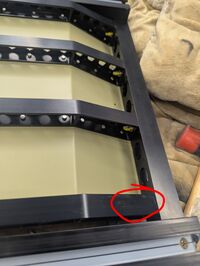
- Step 7: the instructions say to leave all nuts loose, and 49-04 step 4 says to go back and tighten all nuts after the CA1003A and CA1003F sides are attached. However, if you do that you will lose wrench access to the nuts two of the AN3-5A bolts, so plan accordingly and tighten at least that one before attaching CA1003A and/or CA1003F. These are the two nuts where the ribs face outboard; one is circled in this picture:

New Version: 49-04
- Step 2: do not mirror-image this for the other seat; both seats should be built exactly the same until 49-05 Step 3. Specifically, the end of WD-00002 with the extra downward-facing attachment point should be on the left side of both seats.
- Step 5: again, do not mirror image; CA-10003F-R (obviously the right side of the seat) will have the longer MS27039-4-20 bolt for both seats.
New Version: 49-05
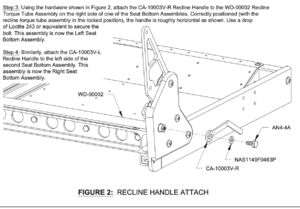
- Step 3: the recline handles are attached such that they end up being on the inboard side of each seat. However on 49-06 there is a note which states that it is optional to reverse these such that they are on the outboard side instead. If using the Aerosport center console, you will likely need to place them on the outboard side to avoid interference.


New Version: 49-06
- Step 4: The outer seat rails are blocking the assembly of the F-1015D mid cabin side covers since they are inserted on the upper end first, then rotated down. For this reason, the outer rails shouldn't be finally assembled before the cabling is done.
Modification for easier removal of seat
Note: the seats come with a label that warns not to modify the seat in any way. The hints below are not a recommendation to violate this.
Rear Seat Clearance
The space behind the seat is tight. Once the seat is free to slide back, it still won't come out because it will bump into the flap torque tube cover before it is completely out of the rail. It is tedious to remove the flap cover, especially if you have carpet on it. An additional mod is to chamfer the front end of the nylon track sleeves in the seats so you can angle the seat up before it hits the flap cover.

Removal from Seat Rails
There are two ways to disable to rail stop, consider making one of the two mods (they save time when removing the seats, nothing more):
- Easier removal of the T-handle (4 AN3 bolts)
- One mod is to replace the nuts with nutplates, so you don't have to fumble with washers and nuts in a tight space. Keep in mind though that a nutplate is not as strong as a lock nut.
- One can also change out the bolts with AN-4s and tap the T-handle bracket. Keep in mind though that bolts usually need to engage into an aluminum thread with twice the diameter in length.
- Easier removal of the rear stopper (2 AN4 bolts - factory installed within the rail)
The mod is to replace the nuts that are part of the seat rail with nutplates below the seat (needs match drilling and longer bolts). Keep in mind though that a nutplate is not as strong as a lock nut.
Note: Nutplates are commonly used with fully threaded bolts where the length of the bolt just needs to meet a minimum length but it can be longer. If you use nutplates with non fully threaded bolts, care needs to go into determining the correct bolt length / washers to avoid bottoming out or having threads show inside the hole. Best to check where the threads end before mounting the nutplates.