SECTION 45: CABIN DOORS & TRANSPARENCIES
Jump to navigation
Jump to search
Build Instruction Updates
- 03/10/05 45_10.pdf
Check for more recent updates here
- Important: if you are using the Planearound 180-degree cam AND the Aerosport low-profile exterior door handles, this guide will save you many hours of frustration.
Before You Start
Special/New Tools/Supplies
- See Window Care for tips and tricks on taking care of your Plexiglass windows
- Consider an angle grinder with stone wheel if you are going to be using McMaster seals on your doors. There is a lot of fiberglass to remove.
- Safety wire and safety wire pliers if you don't already have them.
- Small syringes (like these) to insert epoxy into any missing areas after binding the doors together
- Large syringes (like these) help if you are using the McMaster seals.
- It's nice to be able to remove and re-install the protective wrap on the windows while working on them, and you probably want to end with a nice clean protective wrap as well. Consider buying a role of Collision Wrap; one roll will be plenty for several coatings of all of your transparencies.
- If you are using a window install method that needs deeper window pockets, consider ordering four pieces of Polypropylene Rod, 1/4" Diameter, 8 Feet Long (McMaster part 8658K51) while ordering your door seal. You can temporarily fit these into the window openings as spacers to help build up epoxy around the windows to the proper depth as shown in this photo. See also this FB thread.

- Again, if you plan to deepen the window pockets, a detail belt sander can be extremely useful for finishing out the window openings. This has other future uses as well (e.g. avionics cutouts, overhead console openings, etc).
Modifications to Consider
- For door options see the page Door Locks / Hinges / Handles / Seals.
- The PlaneAround Center Cam is considered a must-have safety device by most builders.
- Especially if using the McMaster seals, consider using upgraded door strut mounts.
- Consider using upgraded door pins and guides. They are made of polished stainless steel vs. hollow aluminum tubes, and the thicker guides are forcing the door into a specific left/right position when closing.
- Consider using door mount capture plates to make installing and removing the door much easier. On the cabin-top side, these are especially nice if you have the overhead console restricting access to the back side of the hinge plates. On the door side, these make it easier to epoxy and clean up the hinge mount point to the door. Either way, these make it quick and easy to remove the doors (which you'll do quite a few times).
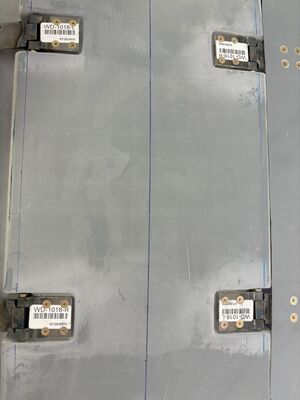
- Four sensors to make sure the four door pins are properly latched are critical to flight safety. Here is one alternative method of mounting those sensors.
General
- If you are installing the PlaneAround third latch, consider installing the gearbox before bonding the inner and outer door shell, see this FB post. Advantage is that you don't need a slot at the bottom of the door and up the inside. Disadvantage is potential gear box contamination during the bonding of the door halves.
- Do not clean adhesive residue off the windows with anything but mineral spirits. Do not clean with concentrated alcohol. The exact instructions can be found here.
- Door fit: See this VAF Thread
and this FB post
and this FB post
and this FB post
and this FB post
and these videos by BuildFlyGo: - Epoxy to use: See this FB Thread 3/2024
- After trimming the windows, you might need to renew the protective wrap, consider using collision wrap.
- Important: if you are using the Planearound 180-degree cam AND the Aerosport low-profile exterior door handles, this guide will save you many hours of frustration.
- This is a pretty good video showing the full door process.
- If you are using both the Aerosport Low-profile exterior door handles and the Aerosport interior door handle covers, see the necessary modifications on this VAF post -- specifically see the image on where to trim the plates.
45-02
- The holes in the two door halves don't align, just use the ones that do align, see also this FB thread 4/2024.
If the bottom 4 holes align nicely, ignore the top two holes. - Don't round off the bottom corners when trimming. Some open holes in the fuselage skin sit in those corners and need to be match drilled with a hole finder or with the split lines.
- You don't have to mark up the cutting lines for the inner half. After marking up and trimming the outer half, cleco the halves together, then copy the outlines including for the window from the outer half to the inner half.
45-04
- Step 6: The doubler does not fit well. It is possible to reduce some of the bend but if you press too hard, the edge flange will buckle. Do not try to grind a curvature into the fiberglass, it is too thin. Consider using a thick layer of flox or cabosil epoxy mix to bridge the gap between the inner door half and the doubler.
- Step 7: Keep the surface of the doubler clean in the area where the strut attach bracket will later sit. You will be using pull rivets to attach the bracket and the rivets need a flush surface to not get crooked during pulling.
45-05
- Step 2: a thin painter's plastic drop cloth works well to protect the fuselage from the door epoxy.
- NOTE: if using PlaneAround 180 degree latch, consider installing the gearbox before bonding the two door halves together.
- Step 7: The cabin top has a flat spot between the doors and the rear window. Your door will not fit flush in this area and you'll have to fix the cabin top with epoxy later. See portion marked red in this picture:

45-06
- A bolt is used as hinge pin. Consider grinding down the head a bit if it interferes with the cabin pocket.
- A group of builders are working on a hinge cover, see OnShape CAD project, check fit using this 1:1 print pdf file
- The plans provide instructions for fitting the hinges to the LHS door, and Step 3 provides the positions for the WD-1019-L and WD-1019-R hinges. The plans then instruct the builder to 'repeat this step for the right side door hinges'. Note: the WD-1019-L hinges must be placed on the left side, "-R" on the right side if you stand in front of each door and look at it.
- A 3D printable Aalignment jig is available to use in lieu of three scrap aluminum spacers.
- More than one AN960-10 washer will likely be required on some of the screws in order to get them to tighten up. Add more washers as needed.
- Check that the top edge of the door is flush with the cabin top and add shims underneath the door side hinge tab if you need to raise the door. For example, the rear hinge might need a 0.080", and the forward hinge might need a 0.060 shim.
See also section 4:


45-08
- Consider using either Silpruf or Sikaflex to install the windows, as described below.
- Consider waiting to install the windows until you have fully finished installing the doors. Building, fitting, installing, and finishing the doors is easier if you can reach into the plane through the windows.
- If you need deeper window joggles (for Silpruf or perhaps also for other methods), consider using a spacer (e.g. poly rod as mentioned earlier) to help increase joggle depth to 1/4". Consider extending to only 3/16" deep on the lower portion of each side window since that portion of the aircraft is flat and it is hard to blend in the increased depth. Note that after removing the poly rod you'll need to clean up the temporary epoxy and clean up the inside of the joggle. It can sometimes be hard to figure out where the edges of the original joggle was, especially on curves where it is hard to push the poly rod all the way tight against the whole radius of the turn. Consider adding color to your first batch of epoxy and filling in these gaps first. Later, when sanding, you'll see that color and know it was added on top of the original edge of the joggle.


Window Bonding
| Silpruf SCS2000 | Sikaflex 295-UV | |
|---|---|---|
| Chemistry | Silicone | Polyurethane |
| Consistency | paste | thick |
| Application | regular Caulk Gun | High Thrust Caulk and Adhesive Gun |
| UV Resistance | 100% UV resistant | May be affected by UV long term |
| Activator/Cleaner/Primers | consider using SS4044P primer for gelcoat side | consider using activator cleaner, then two different primers for window / gelcoat side |
| Later Window Replacement | Old window can be cut out with blade or string. | Very hard to remove old window / sealant, needs grinder. |
| Tensile strength | 341 psi (ASTM D412), 140.5 psi (ASTM C1135) | 290 psi (CQP036-1 / ISO 527) |
| Elongation | 715% (ASTM D412), 353% (ASTM C1135) | 500% (CQP036-1 / ISO 527) |
| Sanding / Painting | Cannot be sanded or painted. Must not spill onto surfaces to be painted later. | Can be sanded and painted. |
| Temperature range | -55F to 300F | -58F to 194F |
| Work Life | 30-40 min | 45 min |
| Cure time | 2-3 mm thickness per 24h at 73F and 50% humidity | 2-3 mm thickness per 24h at 73F and 50% humidity |
| Application environment | 40F to 122F | 50F to 90F |
| Price | Sealant: $10.25 per 10 oz @ Sunshine Supply
Primer Canopy side (SS4044P): $97.95 @ Sunshine Supply Primer Window side: none |
Sealant: $24.79 per 10 oz @ Westmarine
Activator/Cleaner (205, Clear): $33.09 @ Westmarine Primer Canopy side: (206 G+P): $96.57 @ Westmarine Primer Window side: (209D, Black): $112.55 @ Westmarine |
Silpruf Method
- Silpruf @ Sunshine Supply
- Silpruf @ Amazon (note that more colors may be available from other sources); you will need at least 2 standard tubes, possibly 3 total.
- SS4044P Primer for Silpruf (cabin side) @ Sunshine Supply (optional, not needed if Gelcoat gets removed)
- 5-part instructional video
- See also Dan H's write-up of the above Silpruf Method
- See also this Glastar article.
- See also this FB Thread.
- Notes
- The Vans windows come with a black trim line. Even if you cut to the inside of the black line, the window will still be slightly too large to fit. After further trimming, the window will fit into the joggle but the marking tool that is being described in the Silpruf videos will not work properly as you can't run it along the joggle edge where the window touches it or where the gap is too small. It is therefore necessary to do 4 trimmings:
- Trim to inside of black line from Vans
- Trim to make window actually fit into the joggle
- Trim window back enough so the marking tool can ride along the joggle edge
- Trim to exactly the black line you drew with the tool as described in the videos
- This method requires drilling holes along the edges of the windows. If your inside is in a finished state, this will cause patching / touch-ups after the window installation (note: door is double walled and holes don't go through).
- Consider drilling the cleco holes with a #41 drill instead of #40. They still go in fine and sit tighter. If a cleco is not holding when tightening, try to rotate it by 90 degrees as the claws come out on opposite sides in one particular direction.
- Be careful with wing nut clecos: Since the doors are double walled, you may not be able to fully insert the wing nut cleco in shallow areas. Do not proceed if this happens, rather use a thicker stack of wood pieces to shorten how deep they sit. As you tighten the wing nut cleco, the spreader of the cleco is being pushed into the hole. If it hits the inside skin, and you keep tightening, you will pull the cleco out and the hole is ruined.
- Consider using a thin piece of metal, e.g. a 3/1000" feeler gauge, to protect the window while drilling.
- When removing the squeeze-out on the inside, run the spatula tight along the inside edge of the opening and loosely against the window.
- After having removed each segment of the outside tape, and before inserting a cleaned-off cleco back in, put a small piece of fresh clean tape onto the outside skin, underneath the wooden piece that goes across, to protect the outside skin. That's safer than just flipping over the dirty wooden piece as the video instructs.
- Consider cutting the silicone stubs so far back that only very little pressure from the cleco is needed to make the window sit flush. If the stubs push back a lot, the window will be pushed back out a little bit when you remove a cleco during the clean-up process and that will suck silicone into the widened gap. After you then tighten the cleaned-up cleco, the silicone will ooze out but now the tape has been removed and further clean-out cannot happen. Also this forth and back of pressure will make the inside squeeze-out inconsistent.
- The video recommends 6 inch sanding discs which aren't readily available. 4 1/2” flap sander disks from Harbor Freight work as well. Excellent is also the Harbor Freight 3x21 belt sander with 80, then 120, and finally 240 Grit belts (hang it off an engine hoist or ceiling to relieve wrist forces).
- 6mm Scotch Performance Masking Tape 233+, 26344, is a suitable masking tape ([1])
- Scotch Contractor Grade Masking Tape, tan, 1.41" is suitable as tape for the inside [2]
- Expo Wet Erase Markers are suitable [3]
- If you cut paint sticks, cut them first in half lengthwise, then cut off the tab length you need. That way the grain runs across the gap. If you cut the paint stick as it comes across, they will break under load as the grain is parallel to the gap.
- Permatex Ultra Black is suitable[4]
- Cleanroom 6x6 pads Lint Free are suitable[5]
- The Vans windows come with a black trim line. Even if you cut to the inside of the black line, the window will still be slightly too large to fit. After further trimming, the window will fit into the joggle but the marking tool that is being described in the Silpruf videos will not work properly as you can't run it along the joggle edge where the window touches it or where the gap is too small. It is therefore necessary to do 4 trimmings:

Sikaflex
- General Sikaflex instructions
- Yannick B's write-up on using Sikaflex for the windows
Pictures are here. - This thread says one needs 4 tubes of Sika 295: FB thread
- A good read on window attachment is this VAF thread
- June 2023 FB thread
- Be diligent with the window attachment, this VAF thread talks about a window which popped out during flight: this happens
- Feb 2024 FB thread
- Aug 2024 FB thread
45-09
- Skip this whole page if using the Aerosport low-profile exterior door handles
45-10
- Step 3: The handle lever might be covered with a very thin, clear protection foil. Remove it before deburring / polishing!
45-11
- Step 1: do not cut the C-RACK if using the PlaneAround 180-degree latch -- follow its instructions instead.
- Steps 2-4: follow Aerosport instructions instead if using their low-profile exterior handle
45-12
If using PlaneAround 180-degree latch you will still temporarily fit the door blocks but then later replace them with the PlaneAround versions.
45-13
These steps are slightly different if using Aerosport low-profile exterior handles
45-15
- Step 2: consider deferring the marking of the holes until you have installed the door seals and the strut. These items may slightly change where you want the door to sit.
- Step 2: You can still use this same method to mark the door sill even if you are using the upgraded PlaneAround machined door pins. Follow all instructions normally including cutting and tapping the Van's door pins. Then screw in the double-ended screw that came with the PlaneAround 180-degree latch. Then fabricate two 2" pieces of aluminum using the scraps from cutting the original Van's door pins. Tap both ends. Screw one end into the double-ended screw, then screw the fabricated pointy screws into the other end. The photo below shows the pointy screw installed into the fabricated temporary tube which is screwed into the actual threaded door pin after it was cut.

Van's method to mark where to drill door pin holes into cabin top, but since the builder is using aftermarket PlaneAround machined pins, an temporary double-threaded spacer was used. 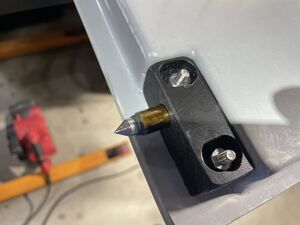
Alternatively to the above elongation method for the pointers, one can add layers of shrink tube and or tape around the pointer so it sits tightly in the guide. The trimmed tubes are long enough to accomplish the marking up step. - Step 3 / Figure 1: The instructions are incorrect. You need to shim the inside (where the two center punched points are) during drilling. Hint: the piano hinge flanges are 40/1000" thick. Note: The aftermarket pin guides are ready to be used, there is no need to prepare and install the stock ones first.


45-16
Step 1
- Check the position of the strut versus the hinge. The innermost hole of the strut is about at the position where the hinge pin resides. If you mount the strut bracket too far outwards, the bracket for the strut on the door end cannot be placed above the window, it would overlap with the window.
- Also be careful with the angle of the struct attach bracket, specifically how the outboard end lines up with the future position of a closed door; at least one builder had a situation where the closed door hits this strut attach bracket.
- If you are getting the Aerosport overhead panel, you need to match drill the door strut attach bracket to the canopy before attaching the overhead panel. It is necessary to notch the overhead panel for the bracket.
- If you are getting the after-market PlaneAround DOOR STRUT ATTACH BRACKETS, do not match drill with a #12 bit since the holes are already threaded for 10-32 bolts. Consider match drilling with a #22 bit, then enlarging the hole to size #12. You may have to chase the bracket threads with a 10-32 tap if the #22 drill bit damaged them.
Step 3
- If you are getting the after-market PlaneAround DOOR STRUT ATTACH BRACKETS, two of the four bushings need to be narrower, 3/8 inch instead of 9/16.
45-17
- Step 2: Consider using stronger, larger diameter blind rivets with a larger bulb to attach the C-1013 strut attach brackets, e.g. CR3213-5-2 (nominal sized, grip .063-.125), CR3213-5-3 (nominal sized grip.126-.187), CR3243-5-2 (1/64 over-sized, grip .063-.125) or CR3243-5-3 (1/64 over-sized grip.126-.187) depending on availability and thickness. See also this YouTube video from Base Leg Aviation.
- Pin plates are not needed if using PlaneAround pins/guides.
- If using McMaster seals you will do this completely different. You will remove the lip from the door opening on the cabin top until it is completely flat (parallel to the door). Consider using an angle grinder with stone wheel for this step. If the lip flares out (towards the door) at at any point it will need to be ground down. Consider a minimum gap of 3/8" all around when the door is closed and clamped flush.
- Temporarily install the seal and shut/clamp the door. Make sure that the compressible part of the seal is compressed to no less than 1/4" all around. Make sure the door sits flush outside the plane. If the gap is not large enough, the seal will compress too much, and the door may bulge.
- Once the gap is sufficiently wide, mix up some epoxy plus micro so it isn't runny and fill in the channel in the seal as you place it around the door. Close and clamp the door to its normal shut position. Let the epoxy dry. Then remove and throw away the seal, sand, paint, and otherwise finish the interior/exterior of the lip, then install fresh seal.
- More information on installing the McMaster seals can be found here: Door Locks / Hinges / Handles


45-18
- Check Van's RV-14 video series on making a fiberglass transition here.
- Check this thread on VAF.
- See also page 43-8 for instructions on how to place the windshield (10 inches back from the top skin edge)
- Instructions say to hold a 7 inch radius template to the top skin and the window in the center section and find how high the fairing should be. Doing the math for a measured angle of 30 degrees between the top skin and the window in the center, these numbers come up:
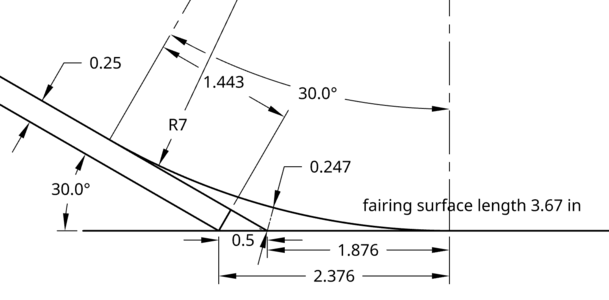
This seems to match well the layup where the top cloth is 3.5 inches wide. The circle segment is 3.67 inches in the drawing above. - Step 9: If you are planning on doing an etch as directed by this step, Bonderite Metal Prep 79 e.g. from Spruce is a suitable product.

45-19
- Windscreen base fairing lay-up The fiberglass cloth for the windshield fairing doesn't come with the kit. Buy e.g. 8.9 oz 7781-50 8-harness satin cloth and 01-14820 peel ply from Spruce. You can also use 8.8 oz 7725 Bidirectional 2x2 Twill. 7781 will make smoother surfaces and conform easier to uneven surfaces, however 7725 is less prone to fray along the edges during handling. Some builders had success with using 2 inch tape instead of a large cloth, see also this VAF thread.
Windshield_to_Fuse_Transition_Steps.pdf
See also Van's video for the RV14.