SECTION 45: CABIN DOORS & TRANSPARENCIES: Difference between revisions
Jump to navigation
Jump to search
m (→45-06) |
m (→45-06) |
||
| Line 9: | Line 9: | ||
== 45-06 == | == 45-06 == | ||
* A group of builders are working on a hinge cover, see [https://cad.onshape.com/documents/84d0ba8a64dbd86d8aee8ad1/w/ed92d4e493cd33946f3013d2/e/1d170d74353b23aebd0a0215 OnShape CAD project], check fit using this 1:1 print [[:Media:Hinge cover v2.pdf| pdf file]] | * A group of builders are working on a hinge cover, see [https://cad.onshape.com/documents/84d0ba8a64dbd86d8aee8ad1/w/ed92d4e493cd33946f3013d2/e/1d170d74353b23aebd0a0215 OnShape CAD project], check fit using this 1:1 print [[:Media:Hinge cover v2.pdf| pdf file]] | ||
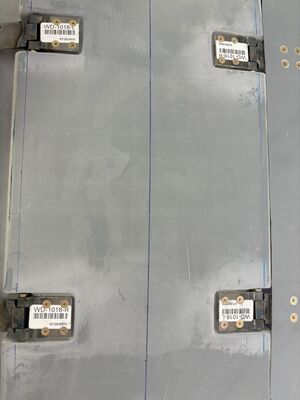
* The plans provide instructions for fitting the hinges to the LHS door, and Step 3 provides the positions for the WD-1019-L and WD-1019-R hinges. The plans then instruct the builder to 'repeat this step for the right side door hinges'. Note: the WD-1019-L hinge must be placed <u>Forward</u> side, and the WD-1019-R hinge must be placed <u>Aft</u> side of the doors, <u>not Left and Right</u> as the part naming would suggest.<br>[[File:WD-1019-L-R Hinges.jpg|Cabin door hinge placement]] | * The plans provide instructions for fitting the hinges to the LHS door, and Step 3 provides the positions for the WD-1019-L and WD-1019-R hinges. The plans then instruct the builder to 'repeat this step for the right side door hinges'. Note: the WD-1019-L hinge must be placed <u>Forward</u> side, and the WD-1019-R hinge must be placed <u>Aft</u> side of the doors, <u>not Left and Right</u> as the part naming would suggest.<br>[[File:WD-1019-L-R Hinges.jpg|300px|Cabin door hinge placement]] | ||
== 45-08 == | == 45-08 == | ||
Revision as of 15:23, 3 April 2024
Build Instruction Updates
- 03/10/05 45_10.pdf
Check for more recent updates here
General
- Door fit: See this VAF Thread
- Epoxy to use: See this FB Thread 3/2024
45-06
- A group of builders are working on a hinge cover, see OnShape CAD project, check fit using this 1:1 print pdf file
- The plans provide instructions for fitting the hinges to the LHS door, and Step 3 provides the positions for the WD-1019-L and WD-1019-R hinges. The plans then instruct the builder to 'repeat this step for the right side door hinges'. Note: the WD-1019-L hinge must be placed Forward side, and the WD-1019-R hinge must be placed Aft side of the doors, not Left and Right as the part naming would suggest.

45-08
- Silpruf Method
Silpruf @ Amazon
5-part instructional video
See also this Glastar article.
This method requires drilling holes along the edges of the windows. If your inside is in a finished state, this will cause patching / touch-ups after the window installation.
The video recommends 6 inch sanding discs which aren't readily available. 4 1/2” flap sander disks from Harbor Freight work as well. - Sikaflex instructions
- A good read on window attachment is this VAF thread
- June 2023 FB thread
- Be diligent with the window attachment, this VAF thread talks about a window which popped out during flight: this happens
- Feb 2024 FB thread
45-19
- Windscreen base fairing lay-up
Windshield_to_Fuse_Transition_Steps.pdf
See also Van's video for the RV12.