Avionics / Panel: Difference between revisions
Jump to navigation
Jump to search
| Line 25: | Line 25: | ||
* [https://static.garmin.com/pumac/g3xstepfiles3.zip 3D CAD-Files from Garmin] ''(Step-format, most G3X, Audio and GPS instruments)'' | * [https://static.garmin.com/pumac/g3xstepfiles3.zip 3D CAD-Files from Garmin] ''(Step-format, most G3X, Audio and GPS instruments)'' | ||
* [https://cad.onshape.com/documents/58051049bcf3496072fa946a/w/9ee1ac39aaf6c431fe3bdfbb/e/7da1ba6f479ce5ebfb6215e3?renderMode=0&uiState=623d448c57fedd6b81806173 Martin's CAD-designed Panel]<br>[[File:RV10_CAD.png|left|thumb|300px|link=https://cad.onshape.com/documents/58051049bcf3496072fa946a/w/9ee1ac39aaf6c431fe3bdfbb/e/7da1ba6f479ce5ebfb6215e3?renderMode=0&uiState=623d448c57fedd6b81806173]]<br>''Hint: Create an account and clone the project. OnShape is free if your files are public.<br>Web-based CAD software, no install necessary.<br>Use right mouse-button or two finger drag to rotate the panel.<br>For iPhone and iPad, install OnShape app.'' | * [https://cad.onshape.com/documents/58051049bcf3496072fa946a/w/9ee1ac39aaf6c431fe3bdfbb/e/7da1ba6f479ce5ebfb6215e3?renderMode=0&uiState=623d448c57fedd6b81806173 Martin's CAD-designed Panel]<br>[[File:RV10_CAD.png|left|thumb|300px|link=https://cad.onshape.com/documents/58051049bcf3496072fa946a/w/9ee1ac39aaf6c431fe3bdfbb/e/7da1ba6f479ce5ebfb6215e3?renderMode=0&uiState=623d448c57fedd6b81806173]]<br>''Hint: Create an account and clone the project. OnShape is free if your files are public.<br>Web-based CAD software, no install necessary.<br>Use right mouse-button or two finger drag to rotate the panel.<br>For iPhone and iPad, install OnShape app.'' | ||
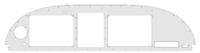
* [https://sendcutsend.com Laser Cutting] [[File:panel.png|thumb|200px]] | |||
Revision as of 01:00, 26 March 2022
Do's and Don'ts
- Don't remove any material from the ribs supporting the glare shield. You need to place the instruments so that they go left, right or underneath the ribs.
- Don't remove the lowest part of the sub-panel to accommodate GPS units (the bottom part with its flange is structural). Rather cut a rectangular hole for the GPS with rounded corners to avoid stress into the sub-panel and reinforce the cut-out with angle brackets as mentioned in the build manual.
- Don't put your backup attitude indicator (e.g. a G5) out of sight (on the copilot side, down on the center console)
- Don't put your IFR-certified GPS out of sight (more than 45 degrees to the right, more than 30 degrees down), unless you install a full annunciator panel in sight.
Panel Builders
- Aerotronics www.aerotronics.com
- Stein Air www.steinair.com
- Midwest Panel Builders midwestpanels.com
Avionics Dealerships
- Aerotronics
- Aircraft Spruce
- List of Dynon Dealers
- Midwest Panel Builders Garmin
New to RV-10. I sent them my entire upper forward Fuselage and they designed mounting shelves and mounted every component, designed the panel with my input and did all the wiring. I also purchased all my Garmin avionics from them. They produced schematics for me. - Pacific Coast Avionics
- Sarasota
- Stein Air
Making Your Own Panel
- 2D CAD-File from Vans (DXF-format)
- 3D CAD-File from Vans (IGS-format)
- 2D CAD-Files from Garmin (DXF-format)
- 3D CAD-Files from Garmin (Step-format, most G3X, Audio and GPS instruments)
- Martin's CAD-designed Panel
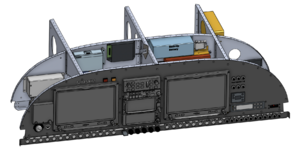
Hint: Create an account and clone the project. OnShape is free if your files are public.
Web-based CAD software, no install necessary.
Use right mouse-button or two finger drag to rotate the panel.
For iPhone and iPad, install OnShape app. - Laser Cutting