Airflow Systems: Difference between revisions
Jump to navigation
Jump to search
mNo edit summary |
mNo edit summary |
||
| Line 8: | Line 8: | ||
*The rivets of the flat shelf support are spaced with a different distance than the side / upper skin rivets that aren't riveted yet. Due to this, it's unavoidable that some rivets will be at the exact same location as the side rivets. New holes need to be found that don't have a conflict. | *The rivets of the flat shelf support are spaced with a different distance than the side / upper skin rivets that aren't riveted yet. Due to this, it's unavoidable that some rivets will be at the exact same location as the side rivets. New holes need to be found that don't have a conflict. | ||
*The evaporator shelf can be cut easily with a [https://www.homedepot.com/p/Dremel-1-1-4-in-Rotary-Tool-Carbide-Cutting-Shaping-Wheel-for-Use-on-Woods-Fiberglass-Plastics-and-Laminates-543/202315728 Dremel 543 Cutoff Wheel] | *The evaporator shelf can be cut easily with a [https://www.homedepot.com/p/Dremel-1-1-4-in-Rotary-Tool-Carbide-Cutting-Shaping-Wheel-for-Use-on-Woods-Fiberglass-Plastics-and-Laminates-543/202315728 Dremel 543 Cutoff Wheel] | ||
* The rivets supplied for mounting the evaporator shelf are | * The rivets supplied for mounting the evaporator shelf are usable but weaker than necessary. They have a marking of "OIDC" instead of a small center dimple. They are made of a soft alloy. Use proper aircraft AD rivets instead. The rivets are not used in a shear fashion, rather the shelf hangs off the rivets underneath the longeron. They need to be strong. | ||
* The kit has only one washer per bolt to attach the evaporator shelf to the side braces. Better to use a washer on the top and bottom to distribute forces across the soft fiberglass | * The kit has only one washer per bolt to attach the evaporator shelf to the side braces. Better to use a washer on the top and bottom to distribute forces across the soft fiberglass | ||
* | * It's optional but if want to lubricate the o-rings before assembly, use e.g this special AC oil [https://www.amazon.com/dp/B008PKVO66 from Amazon]. | ||
* Follow the manual and use only tiny amounts of Loctite 262 around the bottom end of the rivnut before inserting. The substance is etching and will eat away primer on touch. It will only harden in gaps under pressure. Excessive Loctite will never harden and should be wiped away. Loctite cannot be used to create a fillet. | * Follow the manual and use only tiny amounts of Loctite 262 around the bottom end of the rivnut before inserting. The substance is etching and will eat away primer on touch. It will only harden in gaps under pressure. Excessive Loctite will never harden and should be wiped away. Loctite cannot be used to create a fillet. | ||
*You need a nutsert tool to place the nuts into the bottom skin, e.g. [https://www.amazon.com/dp/B09LV22WL7 this tool (similar to a manual pop rivet puller)] or [https://www.pegasusautoracing.com/productdetails.asp?RecID=9698 this tool (twist type)] with this adapter [https://www.aircraftspruce.com/catalog/pnpages/04-01427.php 8-32].<br>If you have a hydraulic knockout punch tool [https://www.amazon.com/gp/product/B07RT8RKQL e.g. this one from Amazon], you can make an adapter for pulling rivnuts by taking a 2 inch piece of a 3/4 steel rod, cutting a 3/4-16 male thread onto one end and an 8-32 female thread onto the other. Use several strong fender washers and two small washers to support the nutsert towards the punch tool or make a washer from 0.3 inch steel. Use a stainless steel 8-32 set screw as bolt. It takes some 6 full pump strokes to set the supplied nuts.<br>[[File:2022-09-04 16-18-41.jpg|500x500px]]<br>[[File:2022-09-04 16-16-03.jpg|400x400px]]<br>[[File:2022-09-04 18-07-51.jpg|400x400px]]<br>[[File:2022-09-04 18-09-23.jpg|400x400px]] | *You need a nutsert tool to place the nuts into the bottom skin, e.g. [https://www.amazon.com/dp/B09LV22WL7 this tool (similar to a manual pop rivet puller)] or [https://www.pegasusautoracing.com/productdetails.asp?RecID=9698 this tool (twist type)] with this adapter [https://www.aircraftspruce.com/catalog/pnpages/04-01427.php 8-32].<br>If you have a hydraulic knockout punch tool [https://www.amazon.com/gp/product/B07RT8RKQL e.g. this one from Amazon], you can make an adapter for pulling rivnuts by taking a 2 inch piece of a 3/4 steel rod, cutting a 3/4-16 male thread onto one end and an 8-32 female thread onto the other. Use several strong fender washers and two small washers to support the nutsert towards the punch tool or make a washer from 0.3 inch steel. Use a stainless steel 8-32 set screw as bolt. It takes some 6 full pump strokes to set the supplied nuts. Additional rivet nuts can be ordered from [https://www.aircraftspruce.com/catalog/pnpages/NAS1329A08K75-25.php Aircraft Spruce].<br>[[File:2022-09-04 16-18-41.jpg|500x500px]]<br>[[File:2022-09-04 16-16-03.jpg|400x400px]]<br>[[File:2022-09-04 18-07-51.jpg|400x400px]]<br>[[File:2022-09-04 18-09-23.jpg|400x400px]] | ||
* The holes in the scoop need to be countersunk for Tinnerman washers. A great tool is [https://www.permagrit.com/large-countersink-100-degree-no-nipple/ Countersink 100º, No Nipple, 11.5mm dia., LC5 from Permagrit] (they ship directly from England). | * The holes in the scoop need to be countersunk for Tinnerman washers. A great tool is [https://www.permagrit.com/large-countersink-100-degree-no-nipple/ Countersink 100º, No Nipple, 11.5mm dia., LC5 from Permagrit] (they ship directly from England). | ||
* There are two options for routing the hoses: through the tunnel or within the side walls. The kit contains only the fittings for the tunnel option (which needs "Z" adapters for the condenser; for routing in the side walls, you need plain 90 degree adapters on the condenser). Specify which routing you want when ordering. | * There are two options for routing the hoses: through the tunnel or within the side walls. The kit contains only the fittings for the tunnel option (which needs "Z" adapters for the condenser; for routing in the side walls, you need plain 90 degree adapters on the condenser). Specify which routing you want when ordering. Airflow will exchange the Z fittings for 90 degree ones on request however they are made to order and it takes several weeks. | ||
*The cables are brought out on the bottom. There is no grommet and the cables chafe inside the evaporator housing at the fan controller. Consider making a new hole at the top, install a grommet and bring the cables out there. Close the hole on the bottom with a piece of aluminum and 4 pop rivets. | *The cables are brought out on the bottom. There is no grommet and the cables chafe inside the evaporator housing at the fan controller. Consider making a new hole at the top, install a grommet and bring the cables out there. Close the hole on the bottom with a piece of aluminum and 4 pop rivets. | ||
*The manual doesn't recommend what to use for sealing against air leaks. PERMATEX # 2 SEALANT seems to do a great job. | *The manual doesn't recommend what to use for sealing against air leaks. PERMATEX # 2 SEALANT seems to do a great job. | ||
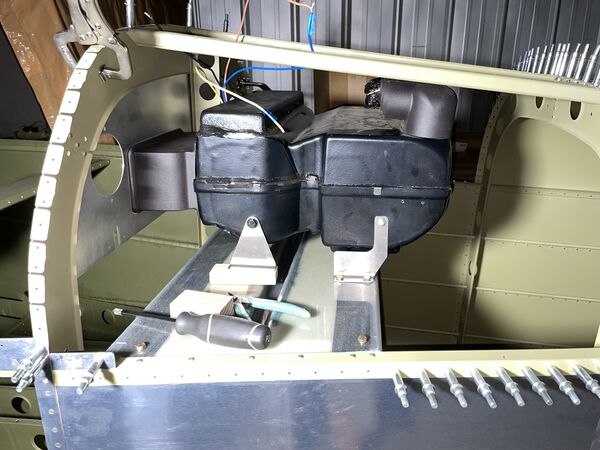
*There are a lot of loose ends when mounting the evaporator, | *There are a lot of loose ends when mounting the evaporator. The issue is that the tailcone bulkhead does not have predrilled holes for the closeout panel as it comes from Vans. So the holes in the upper closeout that Airflow sends don't match up with any existing holes. Later in the build, after the floors are riveted in, you will first install the lower closeout, the attach the upper closeout, then match drill the holes from the upper closeout into the tailcone bulkhead. At that point you would also have riveted the top skin that gives the bulkhead stability. Here is one way of getting it mounted (caution: work in progress, not yet verified how the bottom closeout will fit!):<br>[[File:2022-09-17 19-11-03.jpg|600x600px]] | ||
*#Attach the 3D-printed inlet vents to the evaporator using the bulkhead cutouts for those vents to align them parallel and with the right distance between them. The vents are not symmetrical, there is a left and right one. Check the notch on the bottom to align with the seam of the evaporator housing. There are no extra pop rivets for the nut-plates, be careful that you do grab the nut-plate before setting the rivets. The screws are really hard to get into the nut-pates. Consider putting each nut-plate in a vice and test-driving the screw in once with a bit of lube and an electric impact driver before mounting them. | *#Attach the 3D-printed inlet vents to the evaporator using the bulkhead cutouts for those vents to align them parallel and with the right distance between them. The vents are not symmetrical, there is a left and right one. Check the notch on the bottom to align with the seam of the evaporator housing. There are no extra pop rivets for the nut-plates, be careful that you do grab the nut-plate before setting the rivets. The screws are really hard to get into the nut-pates. Consider putting each nut-plate in a vice and test-driving the screw in once with a bit of lube and an electric impact driver before mounting them. | ||
*#Clamp the bulkhead to the fuselage. Center it left/right by measuring the edge distance at the bottom, should be some 24mm. One of the two holes near the center on the bottom edge will line up with the vertical tailcone strut. Now draw a line with the measured edge distance parallel to the tailcone bulkhead outer edge to outline where the AC bulkhead needs to sit, so it's centered and the left and right edge runs parallel to the outer skin. Use a level, make sure the plane is horizontal, clamp the AC bulkhead matching the marked up outline and check for being horizontal. | *#Clamp the bulkhead to the fuselage. Center it left/right by measuring the edge distance at the bottom, should be some 24mm. One of the two holes near the center on the bottom edge will line up with the vertical tailcone strut. Now draw a line with the measured edge distance parallel to the tailcone bulkhead outer edge to outline where the AC bulkhead needs to sit, so it's centered and the left and right edge runs parallel to the outer skin. Use a level, make sure the plane is horizontal, clamp the AC bulkhead matching the marked up outline and check for being horizontal. | ||
| Line 25: | Line 25: | ||
*#Make a new front bracket that is 0.675 inches taller<br>[[File:2022-09-18 17-57-55.jpg|400px]] | *#Make a new front bracket that is 0.675 inches taller<br>[[File:2022-09-18 17-57-55.jpg|400px]] | ||
*Don't mount the dryer as shown on the drawings of the manual (half way between evaporator and side skin). It needs to stay clear of the seatbelt shoulder harness that passes through this area. | *Don't mount the dryer as shown on the drawings of the manual (half way between evaporator and side skin). It needs to stay clear of the seatbelt shoulder harness that passes through this area. | ||
*Don't install the pressure switch into the dryer! The dryer is pressurized with nitrogen and neither the caps at the in and out port, nor the cap for the pressure sensor must be removed until you are ready to fill the system. If you accidentally depressurized the dryer, it needs to be replaced. | |||
*One needs a 2.5 inch hole saw to drill the hole for the dryer. Missing in the list of tools needed for installation. | *One needs a 2.5 inch hole saw to drill the hole for the dryer. Missing in the list of tools needed for installation. | ||
*The manual shows a 90 degree fitting for the dryer with service port however the kit contains a 90 degree fitting without a port and a straight hose coupling with port. None of the drawings or pictures show this new variation. See also this [https://www.facebook.com/groups/249625742733962/posts/692509681778897 FB thread]. | *The manual shows a 90 degree fitting for the dryer with service port however the kit contains a 90 degree fitting without a port and a straight hose coupling with port. None of the drawings or pictures show this new variation. See also this [https://www.facebook.com/groups/249625742733962/posts/692509681778897 FB thread]. The kit now assumes, you mount the new inline service port at the front edge of the shelf wherever convenient. | ||
Revision as of 04:38, 3 October 2022
Hints
- The governor control cable needs to be routed across the top of the engine. The manual states "Reroute the prop governor control cable over the top of the engine utilizing the Van’s Aircraft bracket, part no. VA-153-PA or VA-183-PC (depending on your need). Note in the photos that the bracket may require modification to clear the pushrod tube." Neither of those parts are in the Vans store. The part is now called VA-153-PC.

- The Airflow AC comes with a replacement for the top part of the baggage compartment bulkhead close-out. It is a flat part and has cut-outs for the air intake and cut-outs for two cold air output vents.
With this setup, it becomes optional to feed an overhead panel with cold air but there are two more 2 inch outlets at the evaporator to feed an overhead panel. Note: The instructions still show a central single large outlet and a corrugated part but the kit contains a flat bulkhead close-out and two 2 inch outlets for the overhead console.
Note: if you install the BRS parachute, two brackets block the area in the bulkhead for feeding air into the overhead console. So either just go with the two close-out vents or feed the air into the overhead console from the side / holes in the bulkhead more towards the sides. - Finding the center line of the scoop: one way of doing it: put the scoop on a wooden board, 16 inches wide with a marked centerline. Put the scoop on the board and check equal distance to the board edge at symmetrical points. Transfer the center line onto the flanges on both ends. Painters tape might be necessary as blank label to be able to see pen marks drawn on it rather than drawing directly on the slippery surface of the scoop.
- Finding the center line on the bottom skin: running a cord from mid firewall to the tail tie down isn't really giving you good center line location precision where you need it. Rather the cord is merely a secondary tool to proof that a specific rivet is indeed on the centerline, or that the center line is indeed running between two specific rivets near where the scoop starts and ends.
- The Airflow scoop has a planar top flange for attachment to the bottom skin, however, the RV-10's bottom skin has a 2 degree bend around the middle of the scoop (at the rear wing spar).

A good way to reshape the scoop is to heat up the scoop to around 133F and then jam high density foam into the groove above the inlet opening and continuing with additional foam in same groove around the sides to the bend point. This pushes the flange up in the forward section to better mimic the bottom skin 2º bend


- The evaporator shelf touches the vertical bulkhead support on its front side and sits flush against the inside edges of the longerons. The manual states that this is roughly 3 inches back from the bulkhead but it's only 2 inches

- The rivets of the flat shelf support are spaced with a different distance than the side / upper skin rivets that aren't riveted yet. Due to this, it's unavoidable that some rivets will be at the exact same location as the side rivets. New holes need to be found that don't have a conflict.
- The evaporator shelf can be cut easily with a Dremel 543 Cutoff Wheel
- The rivets supplied for mounting the evaporator shelf are usable but weaker than necessary. They have a marking of "OIDC" instead of a small center dimple. They are made of a soft alloy. Use proper aircraft AD rivets instead. The rivets are not used in a shear fashion, rather the shelf hangs off the rivets underneath the longeron. They need to be strong.
- The kit has only one washer per bolt to attach the evaporator shelf to the side braces. Better to use a washer on the top and bottom to distribute forces across the soft fiberglass
- It's optional but if want to lubricate the o-rings before assembly, use e.g this special AC oil from Amazon.
- Follow the manual and use only tiny amounts of Loctite 262 around the bottom end of the rivnut before inserting. The substance is etching and will eat away primer on touch. It will only harden in gaps under pressure. Excessive Loctite will never harden and should be wiped away. Loctite cannot be used to create a fillet.
- You need a nutsert tool to place the nuts into the bottom skin, e.g. this tool (similar to a manual pop rivet puller) or this tool (twist type) with this adapter 8-32.
If you have a hydraulic knockout punch tool e.g. this one from Amazon, you can make an adapter for pulling rivnuts by taking a 2 inch piece of a 3/4 steel rod, cutting a 3/4-16 male thread onto one end and an 8-32 female thread onto the other. Use several strong fender washers and two small washers to support the nutsert towards the punch tool or make a washer from 0.3 inch steel. Use a stainless steel 8-32 set screw as bolt. It takes some 6 full pump strokes to set the supplied nuts. Additional rivet nuts can be ordered from Aircraft Spruce.


- The holes in the scoop need to be countersunk for Tinnerman washers. A great tool is Countersink 100º, No Nipple, 11.5mm dia., LC5 from Permagrit (they ship directly from England).
- There are two options for routing the hoses: through the tunnel or within the side walls. The kit contains only the fittings for the tunnel option (which needs "Z" adapters for the condenser; for routing in the side walls, you need plain 90 degree adapters on the condenser). Specify which routing you want when ordering. Airflow will exchange the Z fittings for 90 degree ones on request however they are made to order and it takes several weeks.
- The cables are brought out on the bottom. There is no grommet and the cables chafe inside the evaporator housing at the fan controller. Consider making a new hole at the top, install a grommet and bring the cables out there. Close the hole on the bottom with a piece of aluminum and 4 pop rivets.
- The manual doesn't recommend what to use for sealing against air leaks. PERMATEX # 2 SEALANT seems to do a great job.
- There are a lot of loose ends when mounting the evaporator. The issue is that the tailcone bulkhead does not have predrilled holes for the closeout panel as it comes from Vans. So the holes in the upper closeout that Airflow sends don't match up with any existing holes. Later in the build, after the floors are riveted in, you will first install the lower closeout, the attach the upper closeout, then match drill the holes from the upper closeout into the tailcone bulkhead. At that point you would also have riveted the top skin that gives the bulkhead stability. Here is one way of getting it mounted (caution: work in progress, not yet verified how the bottom closeout will fit!):
- Attach the 3D-printed inlet vents to the evaporator using the bulkhead cutouts for those vents to align them parallel and with the right distance between them. The vents are not symmetrical, there is a left and right one. Check the notch on the bottom to align with the seam of the evaporator housing. There are no extra pop rivets for the nut-plates, be careful that you do grab the nut-plate before setting the rivets. The screws are really hard to get into the nut-pates. Consider putting each nut-plate in a vice and test-driving the screw in once with a bit of lube and an electric impact driver before mounting them.
- Clamp the bulkhead to the fuselage. Center it left/right by measuring the edge distance at the bottom, should be some 24mm. One of the two holes near the center on the bottom edge will line up with the vertical tailcone strut. Now draw a line with the measured edge distance parallel to the tailcone bulkhead outer edge to outline where the AC bulkhead needs to sit, so it's centered and the left and right edge runs parallel to the outer skin. Use a level, make sure the plane is horizontal, clamp the AC bulkhead matching the marked up outline and check for being horizontal.
- Attach the front bracket to the evaporator.
- Use wooden shims to align the evaporator with the inlet vent holes. The front bracket needs to sit on a shim (about 0.675 inches) and the rear end of the evaporator needs to sit on a shim (about 0.98 inches). Make sure the evaporator doesn't sit too high as the pipe fixtures that stick out of the evaporator might then interfere with the J-stringer on the right side.
- Drill a hole on each side into the evaporator at the top hole of the rear bracket. Put an 8-32 nutsert anchor in, attach the rear bracket and mount the rear bracket on the shelf.
- Make a new front bracket that is 0.675 inches taller

- Don't mount the dryer as shown on the drawings of the manual (half way between evaporator and side skin). It needs to stay clear of the seatbelt shoulder harness that passes through this area.
- Don't install the pressure switch into the dryer! The dryer is pressurized with nitrogen and neither the caps at the in and out port, nor the cap for the pressure sensor must be removed until you are ready to fill the system. If you accidentally depressurized the dryer, it needs to be replaced.
- One needs a 2.5 inch hole saw to drill the hole for the dryer. Missing in the list of tools needed for installation.
- The manual shows a 90 degree fitting for the dryer with service port however the kit contains a 90 degree fitting without a port and a straight hose coupling with port. None of the drawings or pictures show this new variation. See also this FB thread. The kit now assumes, you mount the new inline service port at the front edge of the shelf wherever convenient.


