SECTION 10: TAILCONE: Difference between revisions
No edit summary |
|||
| Line 5: | Line 5: | ||
== Preparation == | == Preparation == | ||
Make sure you have enough clecos. During the initial assembly, I used about 650 clecos. | Make sure you have enough clecos. During the initial assembly, I used about 650 clecos. | ||
== Page 10-2 == | |||
Step 3 - Consider also using the center line on the back of the AEX tie down as an additional reference to center the AEX to the centerline of the F-1012A bulkhead. It can be difficult to accurately center the marked lines in the exact centers of the holes as referenced in the plans. | |||
== Page 10-5 == | == Page 10-5 == | ||
Revision as of 14:07, 23 May 2022
If you intend on installing a yaw damper as part of your autopilot package, you are encouraged to think about the mounting hardware for it while you are building the tailcone, as access is much easier NOW than later. See this page for more details: https://rv10.org/index.php?title=Yaw_Damper_Servo
Vans also sells a mounting bracket that fits in the RV-10 tailcone (https://rv10.org/index.php?title=File:Screen_Shot_2022-03-24_at_11.50.50_AM.png) that is perfect for a spot to mount additional hardware. It's much easier to install earlier in the build process than later.
Preparation
Make sure you have enough clecos. During the initial assembly, I used about 650 clecos.
Page 10-2
Step 3 - Consider also using the center line on the back of the AEX tie down as an additional reference to center the AEX to the centerline of the F-1012A bulkhead. It can be difficult to accurately center the marked lines in the exact centers of the holes as referenced in the plans.
Page 10-5
Step 4 - Consider making a jig to make drawing the center line more consistent and efficient. YouTube video: https://youtu.be/yC1kzDO_Gg8?t=590
When cutting the stiffeners to length, consider making them slightly longer than Vans recommends in the instructions by approx 1/8 inch. If cut too short, you may end up with edge distance issues when match drilling the end rivet holes. The length can been then be adjusted if desired after first fit up.
Page 10-13
There is a service bulletin (https://www.vansaircraft.com/wp-content/uploads/2018/03/sb18-03-30.pdf ) for the elevator stop (F-1012D). As mentioned in this YouTube build video (https://youtu.be/g5ONB4e28TI ), Van's did send the required material to create the new part with the rest of the kit (subkit #5), but did not update the plans to reflect the service bulletin.
Page 10-15
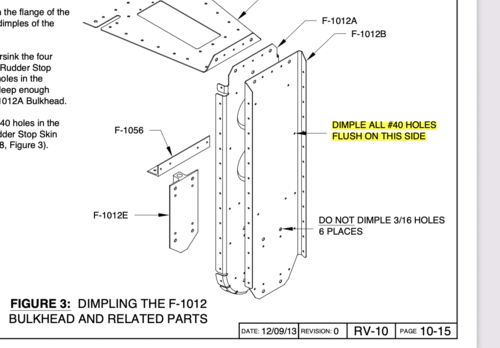
Step 7 instructions only apply to the web of the F-1012B Bulkhead. Dimpling of the flanges of this part is done in step 4 on page 10-16 which instructs to not dimple the topmost hole.
Page 10-20
If working alone, you can get away with riveting the bottom skin stiffeners to the bottom skin before clecoing the side skins on.
Step 7 - The outer rivets are very hard to get to. Plans call for AN470AD4-4 rivets, but you may consider using CR3213-4-2 CherryMax rivets (confirmed with builder support that this should be okay). Measure your parts to ensure proper rivet length. You may have to modify your hand riveter to fit within the opening. YouTube video: https://youtu.be/cvwDYFGeK6s?t=614
