SECTION 43: CABIN COVER: Difference between revisions
Jump to navigation
Jump to search
mNo edit summary |
|||
| (10 intermediate revisions by 3 users not shown) | |||
| Line 9: | Line 9: | ||
** Consider a good belt sander and plenty of replacement belts | ** Consider a good belt sander and plenty of replacement belts | ||
** Use an angle-grinder or a die grinder with plenty of air supply -- consider diamond or masonry cutting discs | ** Use an angle-grinder or a die grinder with plenty of air supply -- consider diamond or masonry cutting discs | ||
** If you don't have a lot of fresh epoxy go ahead and order a gallon for the cabin top plus doors. | |||
* Fiberglass Dust Protection | * Fiberglass Dust Protection | ||
** [https://www.uline.com/BL_1637/3M-Paint-Project-Respirators?keywords=3m+respirator 3M Respirator] | ** [https://www.uline.com/BL_1637/3M-Paint-Project-Respirators?keywords=3m+respirator 3M Respirator] | ||
| Line 16: | Line 17: | ||
Modifications to Consider | Modifications to Consider | ||
* If you | * If you are going to use McMaster door seals and are also going to be painting your cabin top, consider fully prepping the interior surface for paint but not priming or painting anything forward of the rear windows. Prepping is easier before the cabin top is attached but anything anywhere close to the doors will have a lot of work to do once the seals are finished. | ||
* If you are NOT using McMaster seals and ARE painting the cabin top, you should be able to fully prep, prime, and paint before attaching to the fuselage. | |||
* Some people run conduit for wires up the pillars on either side of the windscreen -- you'll want to do that before permanently attaching the cabin top (other people just run wires up the center support bar instead) | * Some people run conduit for wires up the pillars on either side of the windscreen -- you'll want to do that before permanently attaching the cabin top (other people just run wires up the center support bar instead) | ||
* If installing an [https://www.aerosportproducts.com/product/rv-10-carbon-fiber-overhead-console/ AeroSport Overhead Console] it will be easier to fit and attach it before attaching the cabin top | * If installing an [https://www.aerosportproducts.com/product/rv-10-carbon-fiber-overhead-console/ AeroSport Overhead Console] it will be easier to fit and attach it before attaching the cabin top | ||
** If you do this now, you also probably want to install the Gas Strut Attach Brackets (or aftermarket alternatives) as described on page 45-16. | |||
** Note that the instructions are vague about the position of these brackets; if the outboard end is too high the door will hit the bracket when closed. | |||
* If interested in the [https://www.aerosportproducts.com/product/rv-10-door-sill-cap/ Aerosport Carbon Fiber Door Sills] now is a good time to order those. | |||
=== Resources === | === Resources === | ||
| Line 60: | Line 65: | ||
*** [https://www.panamericantool.com/novar-pencil-grinder.html Pencil grinder] | *** [https://www.panamericantool.com/novar-pencil-grinder.html Pencil grinder] | ||
*** [https://www.homedepot.com/p/Dremel-1-1-4-in-Rotary-Tool-Carbide-Cutting-Shaping-Wheel-for-Use-on-Woods-Fiberglass-Plastics-and-Laminates-543/202315728 Dremel Cutting / Shaping Wheel] (You will need more than one) | *** [https://www.homedepot.com/p/Dremel-1-1-4-in-Rotary-Tool-Carbide-Cutting-Shaping-Wheel-for-Use-on-Woods-Fiberglass-Plastics-and-Laminates-543/202315728 Dremel Cutting / Shaping Wheel] (You will need more than one) | ||
Here is a photo with the overhead console attached and some paint prep completed. | |||
[[File:2025-03-18 16.54.47.jpg|none|thumb|Overhead console in place.]] | |||
=== Notes === | |||
==== Page 43-3 ==== | ==== Page 43-3 ==== | ||
* Step 1: | * Step 1: | ||
| Line 71: | Line 82: | ||
* Step 2 | * Step 2 | ||
** Note: The center rivet line on the F-1071 Forward Top skin is NOT center to the airplane! It is offset along with the F-1044A forward fuselage rib and the top center screw of the instrument panel. The center strut is attached to the rib's side. | ** Note: The center rivet line on the F-1071 Forward Top skin is NOT center to the airplane! It is offset along with the F-1044A forward fuselage rib and the top center screw of the instrument panel. The center strut is attached to the rib's side. | ||
** Excessive thickness of the welds at the bottom end of the center cabin brace may prevent proper insertion down to the shim. Consider notching the skin to make it fit. Also consider whether you want cables to run down inside as they also need a skin opening. See also this [https://www.facebook.com/groups/vansrv10/posts/9793935377394140 FB post]. | |||
* Step 4 | * Step 4 | ||
** Since you are drilling through steel guided by a pilot hole in the rib's web, best to first drill with a sharp 1/8 carbide drill bit, then upsize to #12 | ** Since you are drilling through steel guided by a pilot hole in the rib's web, best to first drill with a sharp 1/8 carbide drill bit, then upsize to #12 | ||
* Step 5 | * Step 5 | ||
** The kit comes with three 3 inch cutting discs for trimming acrylic ([https://store.vansaircraft.com/norton-cutting-disc-3-tool-3-cutting-disc.html Norton Discs]). You might have to enlarge the very small center hole to make it fit your grinder or to fit into a cut-off disc arbor. High rpms are not necessary for cutting acrylic, an arbor in a standard drill works fine. | ** The kit comes with three 3 inch cutting discs for trimming acrylic ([https://store.vansaircraft.com/norton-cutting-disc-3-tool-3-cutting-disc.html Norton Discs]). You might have to enlarge the very small center hole to make it fit your grinder or to fit into a cut-off disc arbor. High rpms are not necessary for cutting acrylic, an arbor in a standard drill works fine. | ||
==== Page 43-11 ==== | |||
* Step 3 | |||
** These rivets will be inaccessible if you are bonding the Aerosport center roof console in prior to attaching the cabin top. Suggest installing these rivets BEFORE attaching the top. | |||
==== Page 43-12 Hardware ==== | |||
* Step 1 | |||
** On the forward door post, the longer 10R14 bolts go into the 3 upper holes, the shorter 10R11 ones go into the lower 5 holes. | |||
* Step 2 | |||
** If using the Aerosport Carbon Fiber Door Sills, consider installing them before doing this step. Trim them and put them into place, with the cut edge fitting under the radius where the cabin top sits on the door sill. Then apply the epoxy/filler as directed, permanently attaching the carbon fiber and covering the cut edge. | |||
[[Category:Hints]] | [[Category:Hints]] | ||
Latest revision as of 19:16, 28 August 2025
Build Instruction Updates
- N/A
Check for more recent updates here
Before You Start
Special/New Tools/Supplies
- This is by far the most fiberglass cutting/sanding you probably have done so far this build.
- Consider a good belt sander and plenty of replacement belts
- Use an angle-grinder or a die grinder with plenty of air supply -- consider diamond or masonry cutting discs
- If you don't have a lot of fresh epoxy go ahead and order a gallon for the cabin top plus doors.
- Fiberglass Dust Protection
- 3M Respirator
- coverall with hood
- HobbyAir fresh air respirator (pumps clean air from remote location into mask). Full face mask also protects dust getting into your eyes / face.)
Modifications to Consider
- If you are going to use McMaster door seals and are also going to be painting your cabin top, consider fully prepping the interior surface for paint but not priming or painting anything forward of the rear windows. Prepping is easier before the cabin top is attached but anything anywhere close to the doors will have a lot of work to do once the seals are finished.
- If you are NOT using McMaster seals and ARE painting the cabin top, you should be able to fully prep, prime, and paint before attaching to the fuselage.
- Some people run conduit for wires up the pillars on either side of the windscreen -- you'll want to do that before permanently attaching the cabin top (other people just run wires up the center support bar instead)
- If installing an AeroSport Overhead Console it will be easier to fit and attach it before attaching the cabin top
- If you do this now, you also probably want to install the Gas Strut Attach Brackets (or aftermarket alternatives) as described on page 45-16.
- Note that the instructions are vague about the position of these brackets; if the outboard end is too high the door will hit the bracket when closed.
- If interested in the Aerosport Carbon Fiber Door Sills now is a good time to order those.
Resources
Related Pages
Posts
Videos
- Craig's video
- BuildFlyGo's video 1
- BuildFlyGo's video 2
- A leaf on the Wind Videos
- Rodrigo Damazio Bovendorp' videos
Hints
- (D. Peterson) This is time consuming, but it isn't rocket science. It is an expensive part & you don't want to mess it up, but be methodical & patient and it will be fine. We started with Dremels with Permagrit cutoff disks and also a Dewalt oscillating tool with a "fast wood" blade which worked surprisingly well (get a couple extra blades). I tried a jigsaw, but the blades I had dulled super fast. The 40 grit paper on a belt sander worked very well for the closer work and getting the bottom and sides of the door thin enough. We traced the scribe line with a fine tip sharpie and rough cut to that, then worked our way down until it fit. We probably put it on and off the airplane 15-20 times, which is a bit of a pain, but not bad in the big scheme of things. I now understand what people mean when they say it gets "razor thin"; the edges get very sharp as you get close to the end. Use caution! One thing we did wrong at first was trying fit the aft edge of the Upper Fwd Fuse OUTSIDE the cabin top. It doesn't work well that way. The skin goes INSIDE the cabin top. Seems obvious now. See pic. One thing we did toward the end of the door bottom was get a micrometer out and get average current readings, subtract 0.0625 (our goal of thinning for that round) so we had a goal to trim to. If you do this, mark your micrometer so you are sticking it "into" the cabin edge the same amount (the fiberglass tapers, so the depth of material into the throat of the micrometer affects your measurement). Before it got too thin we were drawing thin permanent marker lines to trim to. I second breathing protection, safety glasses, and hearing protection at least. We also used the air hose to blow ourselves off numerous times. Good luck. It took two of us about a day and a half. It wasn't as bad as I expected.
- There are several tools that work well for trimming fiberglass.
- Note: Vans ships three 3 inch cutting discs with the kit. You might want to preserve those for trimming the acrylic windows or buy more (Norton disc at Vans with 1/4" hole), or 25-pack Norton disc at Amazon with 3/8" hole.
- For the thick straight parts, it's best to use a 4.5 inch grinder with a thin masonry cutting disk.
- This combination is expensive but makes it easy for the finer work. The 60,000 rpm pencil grinder is very small and can rest on top of the surface. It grinds in all directions, meaning one can make an incision near the scribe line and slowly grind sideways until the scribe line is exactly matched, then cut forwards right along the scribe line. Makes cutting as easy as drawing a line.
- Pencil grinder
- Dremel Cutting / Shaping Wheel (You will need more than one)

Here is a photo with the overhead console attached and some paint prep completed.

Notes
Page 43-3
- Step 1:
- The cover's scribe lines for where it needs to mate with the door opening of the fuselage are too far apart. The door opening is only 37 inches but the scribe lines yield a 37 7/16 wide cover. See this VAF thread for details. Consider making a tool to easily measure 1/8 thickness because that is about the final thickness the frame has around the door opening.

- The scribe lines for the bottom of the door opening leave the cabin top too thick. The thickness should be determined by what is needed to have the cabin top joggle sit on the upper edge of the side skins. It will be about 1/8 thick as well.
- The scribe lines for the windows are not giving you the requested 3/4 inch joggle, in some areas, only as little as 0.5 inch. Consider making your own scribe lines for the window cutouts.
- Cutting back the inside opening of the doors is already necessary for the initial install of the cabin top, namely for when doing the match drilling. It's impossible to clamp down the frame if the inside rim isn't trimmed back yet.
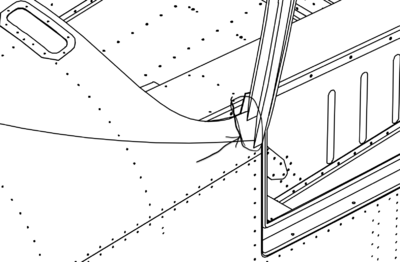
- The distance between the longeron and the upper edge of the outside skin is not necessarily 3/4 inches at all places. Measure and correct for your build. The scribe lines that Vans puts on the side lines are not correct (up to ~ 1 inch). Since the longeron is not necessarily parallel to the upper edge of the side skin, it's better to use the upper edge of the side skin and the upper end of the joggle on the cabin top as the two edges that need to match.

The joggle is nominally 3/4 inch but will depend on the longeron to side skin top edge distance.
Squaring the joggle step with a dremel set to 0.75 inches and the joggle depth.
- The cover's scribe lines for where it needs to mate with the door opening of the fuselage are too far apart. The door opening is only 37 inches but the scribe lines yield a 37 7/16 wide cover. See this VAF thread for details. Consider making a tool to easily measure 1/8 thickness because that is about the final thickness the frame has around the door opening.


Page 43-8 Center Strut and Windscreen
- The strut's forward holes into the cabin top might be close to the edge, see this FB thread
- Step 2
- Note: The center rivet line on the F-1071 Forward Top skin is NOT center to the airplane! It is offset along with the F-1044A forward fuselage rib and the top center screw of the instrument panel. The center strut is attached to the rib's side.
- Excessive thickness of the welds at the bottom end of the center cabin brace may prevent proper insertion down to the shim. Consider notching the skin to make it fit. Also consider whether you want cables to run down inside as they also need a skin opening. See also this FB post.
- Step 4
- Since you are drilling through steel guided by a pilot hole in the rib's web, best to first drill with a sharp 1/8 carbide drill bit, then upsize to #12
- Step 5
- The kit comes with three 3 inch cutting discs for trimming acrylic (Norton Discs). You might have to enlarge the very small center hole to make it fit your grinder or to fit into a cut-off disc arbor. High rpms are not necessary for cutting acrylic, an arbor in a standard drill works fine.
Page 43-11
- Step 3
- These rivets will be inaccessible if you are bonding the Aerosport center roof console in prior to attaching the cabin top. Suggest installing these rivets BEFORE attaching the top.
Page 43-12 Hardware
- Step 1
- On the forward door post, the longer 10R14 bolts go into the 3 upper holes, the shorter 10R11 ones go into the lower 5 holes.
- Step 2
- If using the Aerosport Carbon Fiber Door Sills, consider installing them before doing this step. Trim them and put them into place, with the cut edge fitting under the radius where the cabin top sits on the door sill. Then apply the epoxy/filler as directed, permanently attaching the carbon fiber and covering the cut edge.